
Constructing route stack history with Expo Router
It's hard to craft a route history to enable a customised browsing experience for your app users. This post walks through one way that works for my app that uses expo react native

`expo-router` provides a wrapper around React Navigation library and makes it “simpler” to build complex routes using file-based routing. In app development, it is common to have nested route.
Let say you want to hide app contents from unauthenticated users, use a stack route with just the login screens. Once the user has logged in, redirect them to the inner layout.
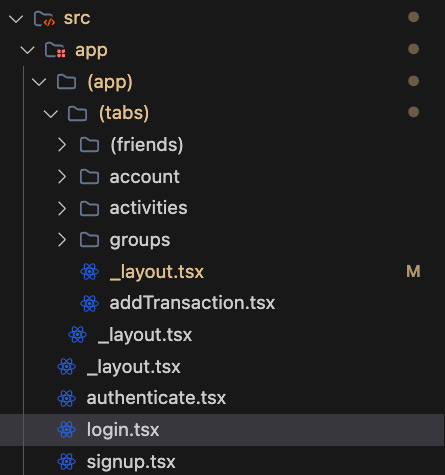
It’s typical to use bottom tabs in an app, you could use the Tabs layout for this. Within each tab, users could navigate to different pages, so a Stack layout could be nested within each tab. It gets complicated pretty quickly. For my simple group expense management app, this is the folder structure that was used:
The difficulty with expo-router appears when we need to construct a certain navigation history for the user. Let say I have an activities log that track which expenses have been added. I want user to be able to click on the activity log, and be taken to the created expense itself. This is easy using `router.push(…)` or `router.replace(…)`.
const href = `/groups/${activity.groupId}/${activity.transactionId}

  const handlePress = () => {
      router.push(href);
  };
The problem with this approach is that the back button would either disappear if user has never visited the groups tab. Or they will have back button that takes them through their entire stack of previous pages they have visited in the groups tab that are not related to this particular expense they just saw. It makes for a confusing user experience. The video below illustrates the browsing experience when we simply push a new route when user click on activity item.
Since expenses live in “groups tab” and activity lives in “activities tab”, I want to provide them some context so that once they got sent to the expense page, they can go back to the group that contain that expense, and after that back to all of their groups. This video demonstrates the desired browsing experience.
To construct a particular stack history, this is the approach I took. Basically, we clear all routes from history, then carefully add back the routes we want user to experience in their history stack. Two notable considerations here.
First, with router.dismissAll(), all BUT ONE route will be left in the router history stack. So we will need to replace that current route with our first desired history route while for the later history routes we will be pushing on to the history stack instead.
Second, we need to wait some period of time between each time we add route to the stack to make sure they are completed, else the routes will not appear in the order that we added them.
  // construct an array of route history
  let hrefs = []
  hrefs.push(`/groups/${activity.groupId}`);
  hrefs.push(`/groups/${activity.groupId}/${activity.transactionId}`);


 const handlePress = () => {
    // first, clear all routes in history except the last one.
    // we can't clear the last one as it will cause an error
    if (router.canDismiss()) {
      router.dismissAll();
    }

    // then replace the last route in stack with the first href in hrefs
    // and push the rest of the href
    // we need to wait for some amount of time before pushing a new route so the router will add new routes in correct order
    for (const [index, href] of Object.entries(hrefs)) {
      if (index == "0") {
        setTimeout(() => router.replace(href), 20);
      } else {
        setTimeout(() => router.push(href), 20 * (Number(index) + 1));
      }
    }
  };
There you have it, that’s one way to construct a route history with expo-router. If you found an easier way to do this, let me know in the comment!